|
By default The Task List is located in the central part of the VIP Team To Do List window under the Task List tab. It displays the list of tasks organized by selected fields, with or without filters applied, and allows changing all of the properties and fields of a tasks.
 |
The task control list consists of an unlimited number of rows (each row is one task) and many columns (Done, Task Name, Priority, Complete, Status, Category, Date last modified, Date Complete, Date created, Date Opened, Due Date, Hyperlink, Left Days, Reminder Time). |
 |
You can easily sort the columns using the Field Chooser. To open the Field Chooser window just make a right mouse-click on a column header and choose the appropriate item from the menu. You can also open the Field Chooser using View-Columns item from the main menu. |
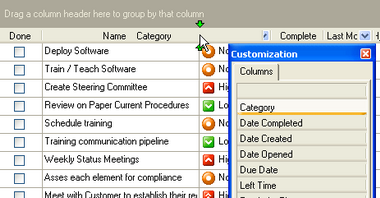 |
To add or remove a column use the Drag&Drop method.
To add a column drag the chosen column from the Customization window and place it where you need in the headers line.
To remove a column just drag it to the Customization window. |
Left Days Field
This is a calculated field that is designed for your comfort and shows how many days are left before completion of your task. If the task is not completed by a set date, then the time left is displayed in red color.
Complete Field
Shows percentage of the task's accomplishment, when the task is finished, the 100% sign is displayed in this field.
"Expand All", "Collapse Al" and "AutoExpand All" Commands.
These commands are designed for a fast tree management. "Expand All" and "Collapse All" expand and collapse all tree branches correspondingly.
"Auto Expand all" - if this flag is "on" then al tree branches will be open and opposite to it. If this flag is off then you can manage this process by yourself.
Tips:
- Tasks may be sorted using filters at the head of each column. Sorting of columns can be made by use of the stylized triangle in the header of each column.
- Tasks within the list can be edited. Select the required task and use either the Enter key or F4 key.
- Completed tasks can be marked by placing of the mouse cursor to the left of the task in the list, and clicking the left mouse button.
- Task navigation is possible by use of the cursor keys.
- New tasks can be created by use of the Insert key or double mouse click on blank space of Tasks List and deleted by use of the Delete key.
- Several tasks can be selected by using the left mouse button while holding down the Shift or Control key.
- Viewing and editing of a task and its properties can be done by double clicking on the selected task.
- You can easily move between Task List and Resources List using Ctrl+Shift+T for Task List and Ctrl+Shift+R for Resources List.
- To assign resources to the task you can drag the chosen resource on the task from the Resource Assignment Bar.
- You can quickly create a resource using the context menu in the Resource Assignment Bar right in the Task List.
Related Topics:


|


