|
Follow these steps:
1. To create a new task, select the  button on the toolbar, or select Tasks\Create Task menu item, alternatively use the Insert button on the keyboard or double mouse click on blank space of Task List. button on the toolbar, or select Tasks\Create Task menu item, alternatively use the Insert button on the keyboard or double mouse click on blank space of Task List.
2. A new task window will appear
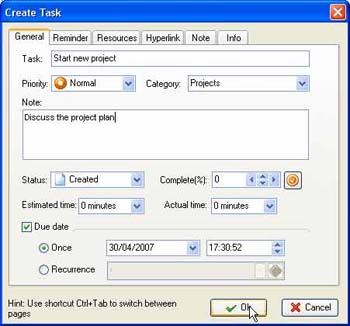
3. Enter task name, priority and category, enter any task notes if required, select due date, complete.
Also for better task process control you can define an estimated time for a task and after completing a task you can enter the actual time. Select required time amount from the corresponding drop-down list or just print it in the corresponding space where "0 minutes" printed by default. To enter a period equal to 1 day just print "1 d", in a similar manner you can use intervals in weeks - "w", hours - "h" or minutes - "m".
The program automatically converts all time periods that are bigger than next period. For example, if you entered 120 minutes it will be converted to 2 hours. Similarly 7 days will be converted to 1 week.
4.
You can also add notes using the Note tab where you have a fully functional editor. Here you can change a font type, size, color or style. Also you can change the formatting of a text and make a marked list
.
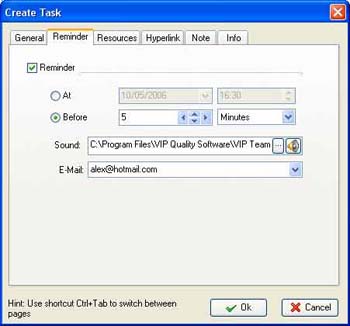
In the E-Mail field you can enter or select from the e-mail list the address for sending notifications and reminders about the task.
Press Enter or double click to close e-mail list.
5 . Click the Resource Tab and select the resources to be assigned in the resource list. To assign a resource, tick the check box opposite its name or press the Space key on the keyboard.
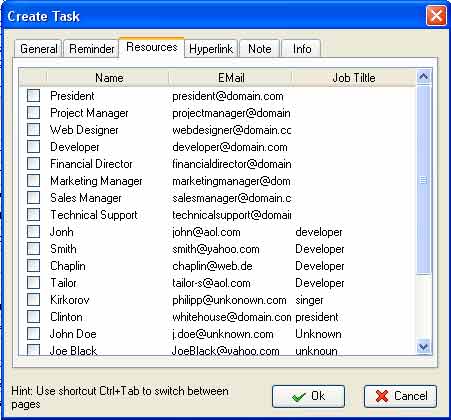
On assigning, the task is added to the list of relevant tasks of the resources, and if required the To Do List or a notification about the change of the To Do List (if its published on the Web) can be sent to the team member.
6. Click OK or press Ctrl + Enter on the keyboard.
Tips:
- Use the “Show message box” option for turning on display of a task reminder. You may turn off a task reminder display if you use a reminder via E-mail.
- Use the “Sound’ field for pointing a path to a media file that will be played back when a due date of a reminder expires.
- Use the E-mail field for entering addresses (to which) e-mail messages with task reminders will be sent to. (Attention: For the correct work of this functionality it is necessary to configure SMTP server parameters. For details see the chapter
Options | SMTP Options.)
Related topics:
- Create a task
- Deleting a task
- Editing a task
- Filter tasks
- Grouping tasks
- Sorting tasks
- Change of categories
- Managing the task order
- Task properties


| 

